🏛️ Complete the mission details
Edit Mission Information
Mission Name *
The mission name cannot be modified.
Format: [mission city] - [mission country]
Examples: New Delhi – India
Mission Official Name
Format: Embassy of Romania to [country]
Examples:
Embassy of Romania to India, Nepal and Bangladesh
Embassy of Romania to the Republic of India
RSVP Email
Enter the RSVP email address (if it exists) or the main mission email.
Examples: newdelhi.rsvp@mae.ro or newdelhi@mae.ro
Tips:
To this email address, the emails will be sent initially.
Ambassador
Enter the name of the ambassador:
Format: H.E. Mr./Mrs./Ms. [Ambassador Name]
Examples: H.E. Ms. Sena Latif.
🎉 Create an event
Title:
National Day of Romania or
Romanian Art Exhibition or
Christmas card
Date: 26.11.2026
Time:
19:00 hrs onwards or 7:00 p.m. to 9:00 p.m.
Location:
                  The Imperial New Delhi Hotel, The Royal Ballroom

                  Janpath Lane, Connaught Place, New Delhi 110001
Tips:
You can also create other events using the same structure. You can send Christmas, New Year cards, etc. [Christmas card]
👥 Create the guest list
Add Company
Title: The name of the company or mission/country (use short names):
- Mission: Argentina
- Ministry: MFA(Ministry of Foreingn Affairs)
- Organization: UN, UNESCO
- Company: India Today, Coca-Cola
Group Name:
South America Embassy / Journalists / Officials / VIP.
Phone / Email: The phone and email of the mission or company (optional).
Add Person (to mission/company)
Name: The full name of the guest.
Ex: H.E. Mr. Emilio Estevez and spouse //this name will be shown on invitation
Role: The person’s function/role.
Ex: Ambassador, Journalist, Ministry
Email*: The person’s email address (mandatory).
Active: Select “Active” if the person is currently in office.
Inactive: Select “Inactive” if the person is no longer in office.
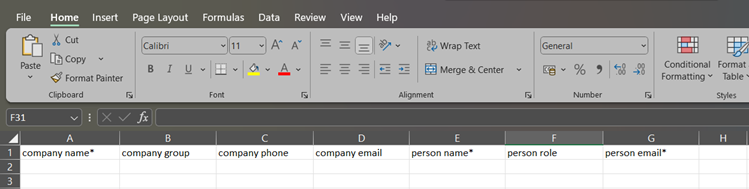
You can upload the persons from an Excel file. It must be like the example below:
💌 Create and send emails
On this page:
- Left: Create and edit messages
- Right: Guest list
1. Select the event
Choose the event for which you want to send invitations.
2. Automatic email
Subject: [Event Name] – Reception Invitation
        requests the pleasure of the company of {{name}} at a Reception on Wednesday, 26th of November, from 19:00 onward at The Imperial New Delhi, The Royal Ballroom Janpath Lane, Connaught Place, New Delhi 110001

        Dress: Formal / National / Uniform

        Kindly bring a printout or soft copy of your invitation with QR code (strictly personal and non-transferable), along with a valid original photo ID.
The text can be customized (font, color, size, etc). The date, time, and location are taken from
the details entered when creating the event.
{{name}} - is replaced with the guest’s name in each email.
Press the Select Templates button to select available templates or upload new templates for your events or greetings cards. After you modify the message to the desired form, you can save it to the event by pressing SAVE button . (Use DELETE button to delete message from the event)
3. Send emails
In Email Preview you can see the final message. Select up to 50 guests/once and press SEND EMAILS.(to avoid SPAM filters) The invitations are automatically sent to the embassy’s email address set in the mission details. From Microsoft Outlook the emails are sent automatically/manually using a VBA macro.
📋 List of responses
After sending the invitations, the system allows managing responses (RSVP) and confirming guests’
attendance.
The recorded responses are:
- Email sent - when sending emails
- Confirmed, Declined - when pressing the CONFIRM or REGRETS buttons in sent emails
- Present - when verifying guests at the entrance on the day of the event.
✅ Guest check-in
On the day of the event, guests can be verified at the entrance by the QR code on the invitation or based on the list saved in the system by searching by name or company.
💻 Microsoft Outlook Macro
In Outlook create a macro and paste the code below. Replace
SEND_FROM with the embassy’s address.
Sub ResendRSVP_Emails()

Dim olApp As Outlook.Application
Dim olNS As Outlook.NameSpace
Dim senderAccount As Outlook.Account
Dim rsvpInbox As Outlook.MAPIFolder
Dim emailsFolder As Outlook.MAPIFolder
Dim itm As Object
Dim olMail As Outlook.MailItem
Dim newMail As Outlook.MailItem
Dim att As Outlook.Attachment
Dim tempPath As String
Dim tmpFile As String
Dim i As Long
Dim k As Long
Dim parts() As String
Dim OldSubject As String

Const SEND_FROM As String = "newdelhi.rsvp@mae.ro" ' ← schimbă cu emailul ambasadei

Set olApp = Outlook.Application
Set olNS = olApp.GetNamespace("MAPI")
Const SOURCE_ADDRESS As String = "rpdtkkji@rsvp-romania.eu"

On Error Resume Next
Set rsvpInbox = olNS.Folders(SEND_FROM).Folders("Inbox")
On Error GoTo 0

If rsvpInbox Is Nothing Then
MsgBox "Nu s-a găsit Inbox pentru contul " & SEND_FROM, vbCritical
Exit Sub
End If

On Error Resume Next
Set emailsFolder = rsvpInbox.Folders("Emails")
If emailsFolder Is Nothing Then
Set emailsFolder = rsvpInbox.Folders.Add("Emails")
End If
On Error GoTo 0

Set senderAccount = GetAccountByAddress(SEND_FROM)
If senderAccount Is Nothing Then
MsgBox "Nu s-a găsit contul " & SEND_FROM, vbCritical
Exit Sub
End If

tempPath = Environ$("TEMP") & "\"

For i = rsvpInbox.Items.Count To 1 Step -1
Set itm = rsvpInbox.Items(i)

If TypeName(itm) = "MailItem" Then
Set olMail = itm

If LCase(olMail.SenderEmailAddress) = LCase(SOURCE_ADDRESS) Then
Set newMail = olApp.CreateItem(olMailItem)
OldSubject = Trim(olMail.Subject)

If InStr(OldSubject, "|") > 0 Then
parts = Split(OldSubject, "|")
newMail.Subject = Trim(parts(0))
newMail.To = Trim(parts(1))
k = k + 1
Else
newMail.Subject = "The email subject is in wrong format"
newMail.To = SEND_FROM
End If

newMail.HTMLBody = olMail.HTMLBody
newMail.SendUsingAccount = senderAccount

For Each att In olMail.Attachments
tmpFile = tempPath & att.FileName
att.SaveAsFile tmpFile
newMail.Attachments.Add tmpFile
Next att

newMail.Send
olMail.Move emailsFolder
DoEvents
End If
End If
Next i

MsgBox "Au fost retrimise " & k & " emailuri.", vbInformation
End Sub


Private Function GetAccountByAddress(address As String) As Outlook.Account
Dim acct As Outlook.Account
For Each acct In Application.Session.Accounts
If LCase(acct.SmtpAddress) = LCase(address) Then
Set GetAccountByAddress = acct
Exit Function
End If
Next
Set GetAccountByAddress = Nothing
End Function